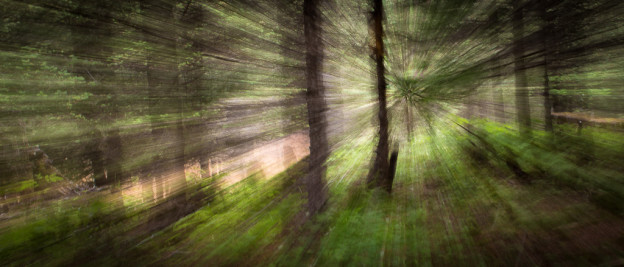
I entered the image below into the Niagara Falls Camera Club’s December 2012 competition as a colour print. I had a few comments and questions with regard to how I achieved my final results.

This image was captured around Shangri-La in China in late June while I was building my body of work.
Camera EXIF data is;
- Camera Canon 5D MKIII
- Lens Canon 24-70mm EF 2.8L VER I
- ISO 100
- Aperture F 22
- Exposure 1.3 seconds
- Zoomed to 24mm from around 50mm
- I used a Circular Polarizer to provide a longer exposure
Capture and in camera considerations;
Camera on solid tripod
- If needed use the hook on your tripod to stabilize even more
- Be aware, if it is windy a bulky bag can induce shake by swinging in the breeze
- I use an Induro AX214 not the heaviest duty however adequate, rated at 8kg and it is relatively light until I added my ball mount
- My ball mount is a Really Right Stuff BH-40 LRII
- The 5D MKIII has a Kirk L Bracket to facilitate taking portrait and landscape images quickly with a minimum of recomposing. The L-Bracket also keeps the weight of the camera and lens over the center of the tripod unlike tipping your camera into the drops on your tripod moving the center of balance away from center of the support. All my DSLR cameras have L-Brackets.
Capture
- Look at where the Light is coming from and use from and use for drama and definition
- Make sure your camera is level
- Plan your zoom points, both start and finish
- Border Check look for mergers and or distractions that may creep into your final image
- A cable release will make taking the image easier
- Turn on “Highlight and Shadow” warnings
- Check your histogram to make sure you are not blowing out highlights or losing detail in shadows.
- Digital is wonderful, we can see the results of our capture instantly
- I always capture in RAW to give me many more options when working in the digital darkroom
Post production
Lightroom
- I use Lightroom 4.X for all my importing, file management and much of my digital darkroom needs
- Convert to DNG, Keyword and Apply my metadata presets
- Adjust white balance and other global adjustments
- Apply lens correction preset to correct for distortion
- For this image I purposely cropped so the center radial point was at the top right point, using the rule of thirds. This created stronger leading lines.
- Lightroom as well as Photoshop both now allow you to retain the removed pixels after cropping, great features!
NIK Color Efex Pro 4
- All I did here was add a little graduated fog from top left on a slight angle
- I dropped opacity to create a subtle dreamy look
Printing
I printed on an Epson Stylus Pro 4800 printer from Photoshop on Red River 68# Ultra Pro Satin paper
If you have any questions feel free to comment or contact me directly.
Keep snapping!
Hi, Neat post. There is an issue together
with your website in internet explorer, might test this?
IE nonetheless is the marketplace leader and a large part of other people will pass over your
fantastic writing due to this problem.
Thanks for pointing this out. The new theme I am trying has me checking all posts to fix broken links. Thought I had caught them all. Now to solve other issues.